Accessing region-locked iOS features, such as EU app stores
The European Union's Digital Markets Act obligates Apple to provide certain features to iOS users in the EU, such as third party app stores. I live in the US and was able to develop a relatively-straightforward method to spoof your location on iOS and access these features, as well as any other region-locked iOS features you might be interested in experimenting with, even if you aren't in the required region.
If you look at the reverse engineered documentation, it would seem to be difficult to fool Apple's countryd service, since it uses almost all available hardware radios to determine your location – GPS, Wi-Fi, Bluetooth, and cellular. However, Apple has developed a "priority" system, roughly ranking the relative reliability of each location determination method. Since Location Services has the highest priority value, if it returns a location result, the results from the other methods seem to be ignored. Location Services relies solely on GPS and nearby Wi-Fi access points if Airplane Mode is enabled (and Wi-Fi re-enabled). Therefore, if you can spoof Wi-Fi geolocation (or if you can spoof GPS), then you can access region-locked features from anywhere, even on the iPhone with its wide array of radios.
On non-cellular iPad models, it has the potential to be even easier, because they only use Location Services (which can be disabled), or Wi-Fi country codes (which can be trivially spoofed). I was able to get this spoofing method working as well. However, it's not covered here.
I tested this with:
- 2 ESP32 units creating 25 spoofed networks each (total 50)
- iOS 18.2.1 on an iPhone 15, and an iPad Mini 6th gen
I was amazed at how consistent and reliable spoofing is, especially accounting for the low cost of the hardware involved and the simplicity of the spoofing software and method.
Most of the work was already done by Lagrange Point and Adam Harvey, developer of the Skylift tool. I was inspired by Lagrange Point's article to experiment with this and to reproduce their results. Check out their article on enabling Hearing Aid mode on AirPods in unsupported regions!
Please note that Apple could make the checks more difficult to bypass in the future through iOS updates. They don't have much of a reason to, since the current system is most likely more than sufficient to deter the average user from doing this, but it's very possible.
Contents
Procedure
What you'll need
- Some experience with the command line
- An iOS/iPadOS device with a USB-C port (recent iPads, or iPhone 15+)
- You might be able to make it work on a Lightning iPhone, but it's much easier with a USB-C port + hub
- A USB-C hub with Ethernet, HDMI out, and several USB ports
- A USB keyboard and mouse
- A USB-C extension cable
- A display with HDMI input
- One or two "faraday pouches"; make sure one is large enough to hold your device, and if buying a second make sure it's large enough to hold the other one
- Any other faraday cage setup allowing only the tip of a single USB-C cable to break through the cage will work too, but these pouches make it easy
- In my testing, using two pouches did reduce the number of external Wi-Fi networks appearing on the Wi-Fi list to zero, but I was still able to make it work with only one pouch – WMMV
- A router that you can install a VPN on
- You'll need to plug the router directly in to the device via an Ethernet cable, so a secondary/portable router is preferred
- Access to a VPN service with an option to place yourself in an EU country
- One or more ESP32 dev modules (preferably at least two)
- A small battery power supply for the ESP32 modules (a small USB power bank works)
- A free WiGLE account
These instructions assume you're using a Unix shell, so you might have to modify some of the commands slightly if you're on Windows.
Preparing the router
- Install a VPN on your router placing you in your chosen target country.
- For OpenWrt routers: see https://openwrt.org/docs/guide-user/services/vpn/wireguard/client
- Select an EU member state supported by your VPN as a spoof target. I chose the Netherlands.
Preparing the device
Creating a secondary Apple ID
You can't easily change the region on your Apple ID, and you probably don't want to do that anyway. But you can create a secondary Apple ID for use only while your device thinks that it's in the EU.
- Enable Airplane Mode and disable Bluetooth and Wi-Fi.
- Connect the device to the USB-C hub, and the USB-C hub to the router via Ethernet.
- Change your device region to your target country in Settings → General → Language & Region → Region.
- Sign out of your Apple ID: Settings → Your Account → Sign Out.
- You'll need to sign out completely (including iCloud) in order to create a new account. Your data will not be lost. When you switch accounts again in the future, you only need to sign out of the App Store ("Media & Purchases"), not iCloud as well.
- Create a new Apple ID.
- You can use the same phone number that's attached to your other Apple ID, or a Google Voice number.
- For email, you'll need to either create an iCloud email, or use a "plus-style address".
- Make sure the Apple ID region is correct: App Store → Your Account → Your Account → Country/Region.
- Install at least one free app from the App Store to initialize the account.
Getting Wi-Fi data
- Find a popular indoor public attraction offering free Wi-Fi within the target country using Google Maps or similar software. I chose the Rijksmuseum. Note down the GPS coordinates of the center of the building.
- Imagine a rectangle surrounding the building and note down the GPS coordinates of the top-left and bottom-right points.
- Create a free account on WiGLE.
- Query the WiGLE database using the online API interface with these parameters:
-
latrange1: lesser of two latitudes you noted -
latrange2: greater of two latitudes you noted -
longrange1: lesser of two longitudes you noted -
longrange2: greater of two longitudes you noted -
closestLat: latitude of center of building -
closestLong: longitude of center of building -
resultsPerPage: 25*n where n is the number of ESP32 units you have (e.g. 50 for 2 units)
-
- Execute the request, then download the response as JSON
- Clone the skylift repository:
git clone https://github.com/DownrightNifty/skylift - Set up skylift:
cd skylift/ python3 -m venv .venv source .venv/bin/activate pip install -r requirements.txt pip install setuptools python setup.py develop - Convert the JSON data to the format used by skylift:
# replace $PATH_TO_JSON, $TARGET_LAT, and $TARGET_LONG python ./extras/wigle_to_skylift.py $PATH_TO_JSON ./w2s_out $TARGET_LAT $TARGET_LONG - Create the arduino sketch(es):
c=1 for file in ./w2s_out/*; do skylift create-sketch -i "$file" -o ./out_"$c" --max-networks 25 --board esp32 ((c++)) done - Use the Arduino IDE to upload each sketch to each ESP32 unit.
Pre-generated Wi-Fi data
If you're having trouble with acquiring the data yourself, you could try using the sample data that I generated. If a large number of people start using it, I don't know if it will continue to work indefinitely, so please use your own data if possible.
The sample data can be found under the generated/ directory in my fork of Skylift.
Placing the device in the faraday pouch
- Before you continue, check the device's settings:
- Enable Airplane Mode, disable Bluetooth, and re-enable Wi-Fi.
- [Optional] Disable your lock screen (this makes controlling the device externally easier).
- [Optional] Make sure Apple Maps is allowed to access your location "while using the app": Settings → Privacy & Security → Location Services → Maps. Required because ask-for-permission prompts annoyingly don't appear on external displays.
- [iPhone only] Enable AssistiveTouch: Settings → Accessibility → Touch → AssistiveTouch. Required to enable mouse support on iPhone.
- Make sure you're signed in to the App Store with the EU Apple ID you created earlier: Settings → Your Account → Media & Purchases. Signing in to iCloud as well is unnecessary.
- Connect the USB-C extension cable to the device.
- [⚠️ Important] Insulate the ESP32 units from the metallic faraday pouch using plastic bags or something.
- Connect the ESP32 units to the battery.
- Place the device into a faraday pouch, along with the ESP32 units and their battery. Seal it as well as possible with only the tip of the cable sticking out (reducing its ability to let in radio signals).
- If one pouch doesn't work, try using two pouches (placing one inside the other)
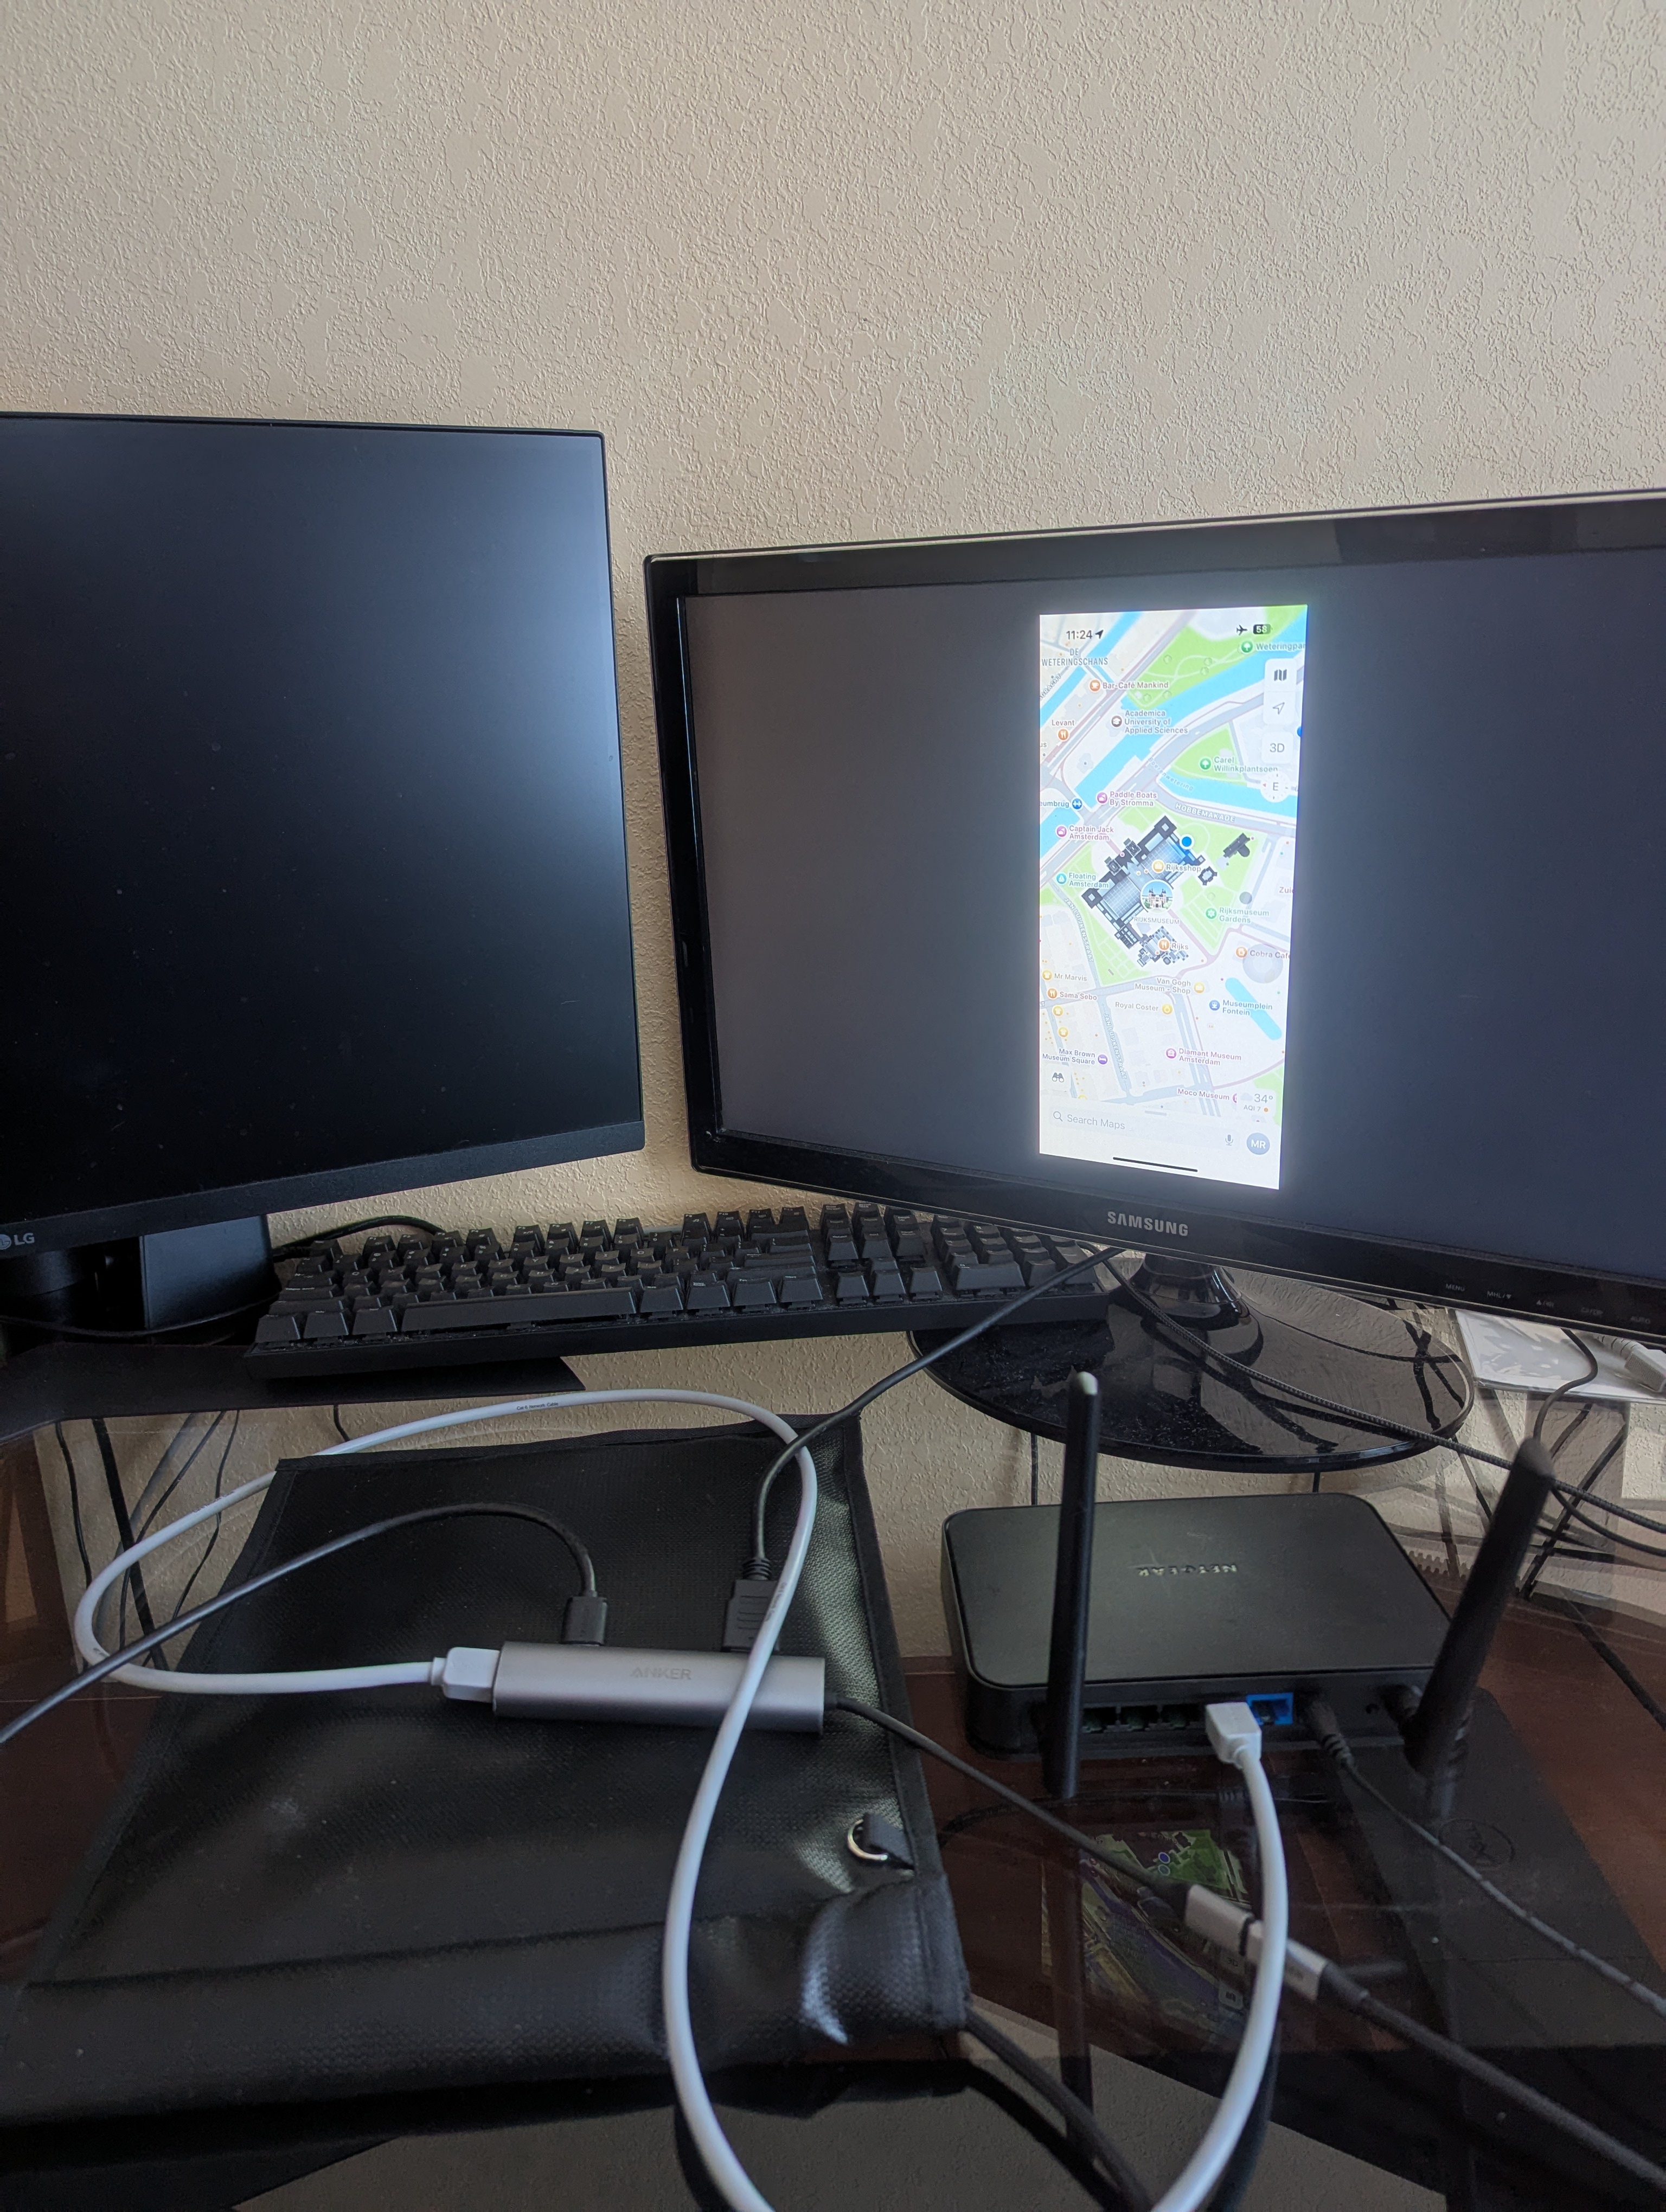
- Connect the USB-C hub to the cable. Connect the router via Ethernet, and a keyboard, mouse, and display via HDMI.
Spoofing location and unlocking EU features
Your iOS device should now only see the spoofed Wi-Fi networks, and cannot receive a GPS signal. Since we have a cable sticking out, this isn't a perfect faraday cage and it's possible that especially strong signals such as cell signals will make their way through, but that's okay.
- Make sure that you can control the device inside the faraday pouch using the connected keyboard, mouse, and display, and that the device has internet access through Ethernet.
- [Optional] Check the nearby Wi-Fi list to make sure you can only see fake Wi-Fi networks.
- If you see one or two nearby networks, that should still be okay; the geolocation service seems to ignore irregularities like this and returns the most likely location result, considering all nearby networks.
- 5GHz Wi-Fi is stronger than 2.4GHz. You could temporarily disable 5GHz on your main router if that helps.
- Disable Location Services and then re-enable it.
- Open Apple Maps and check to make sure it places you inside your target country.
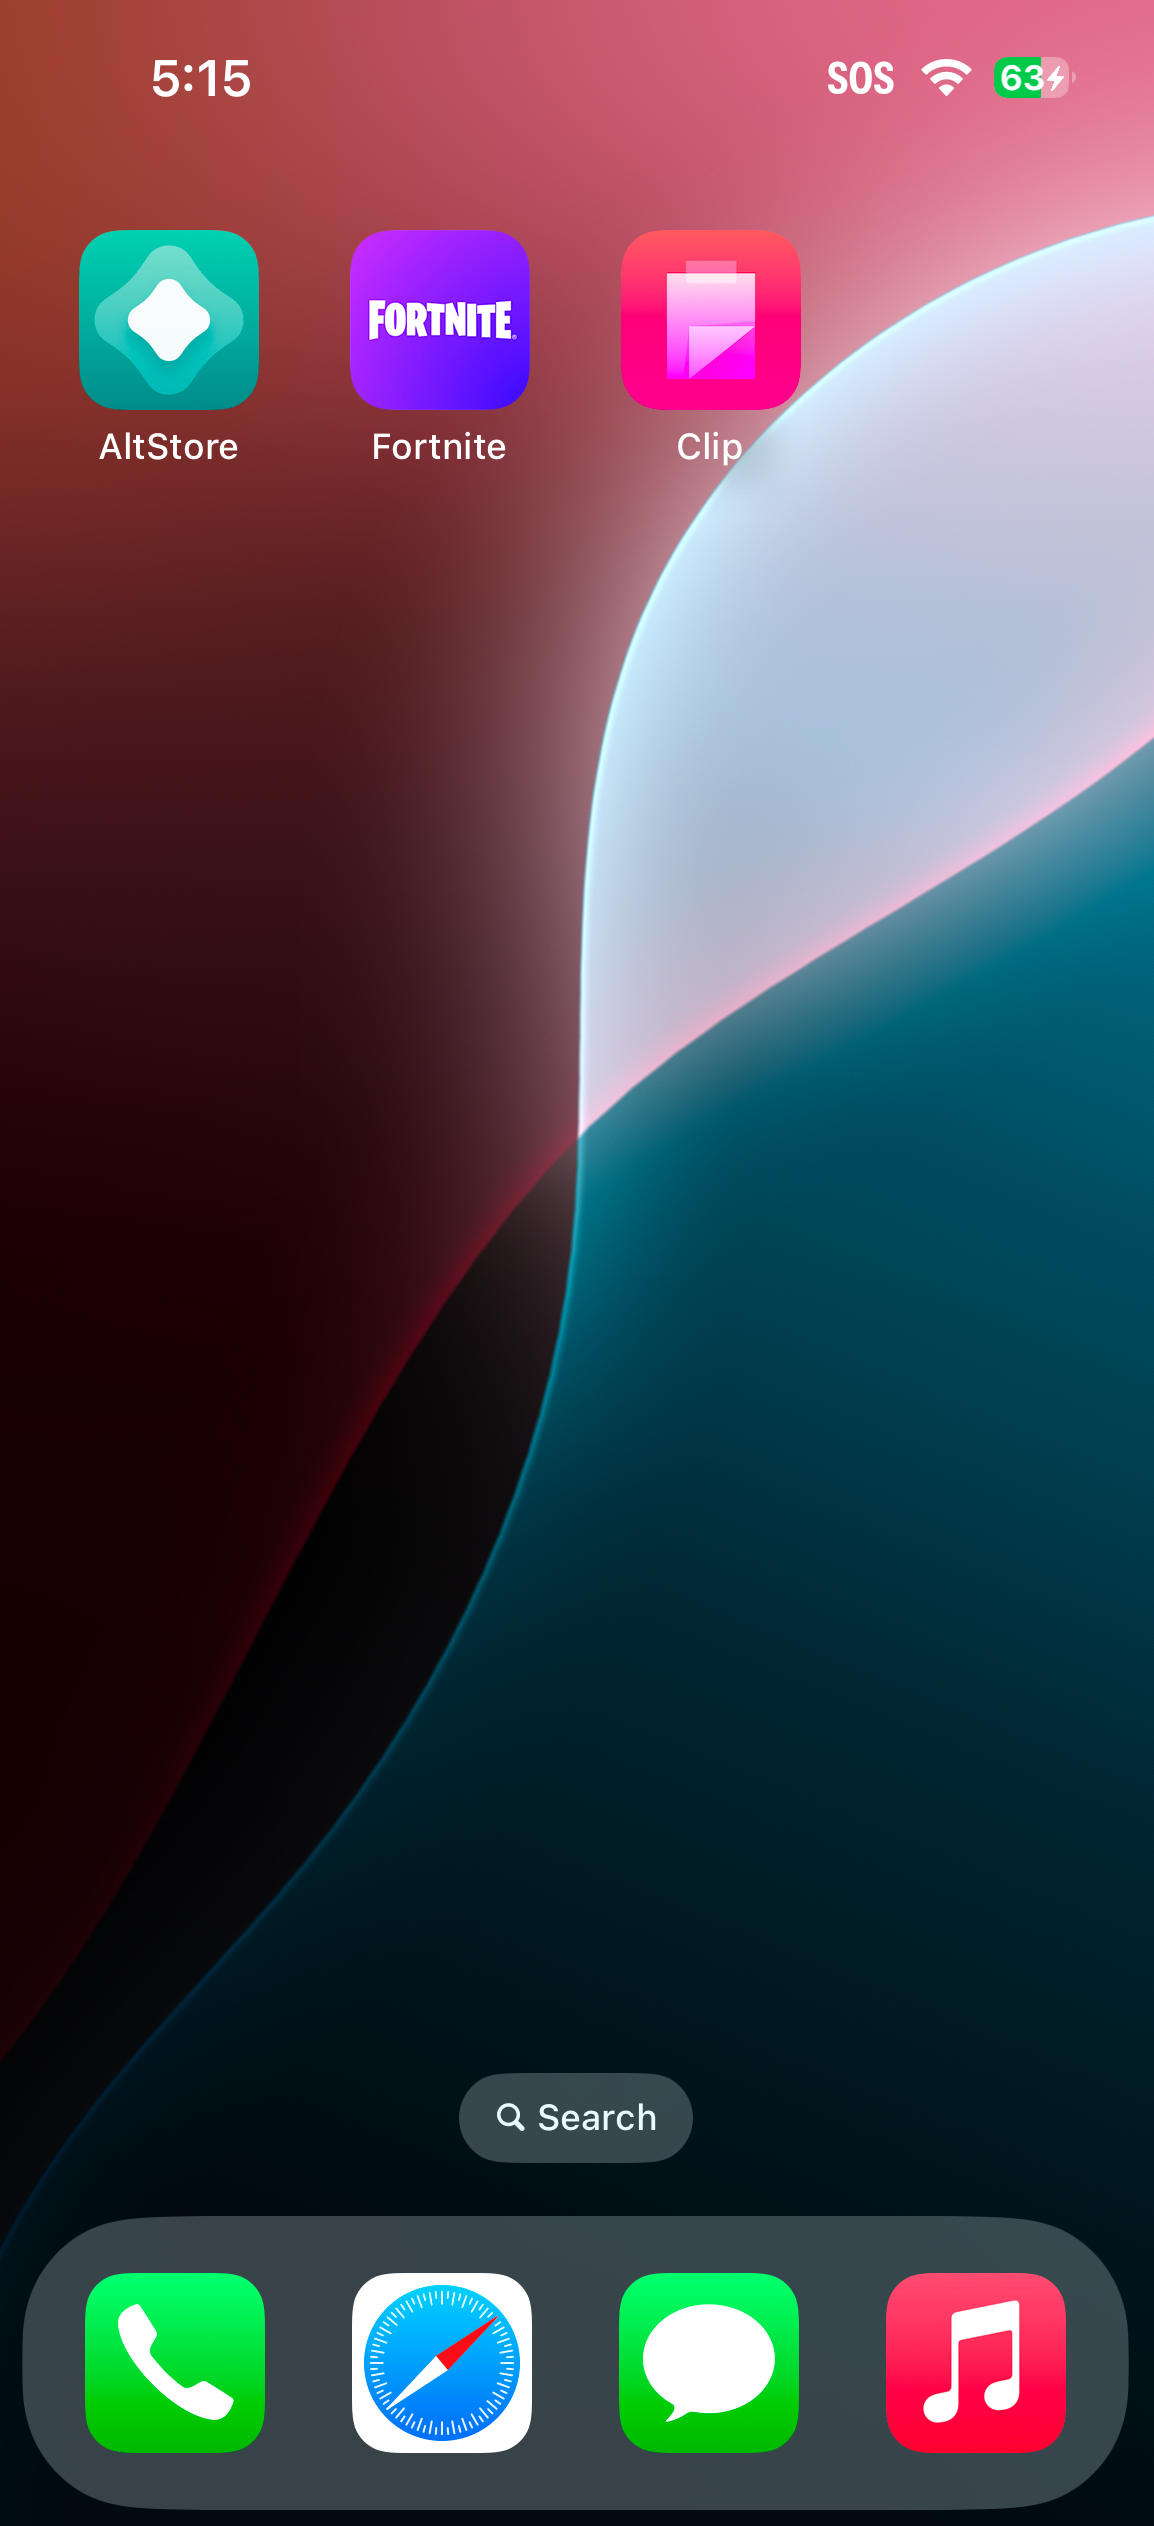
- You should now have access to EU features such as third party app stores. Try installing AltStore PAL at: https://altstore.io/download
If it doesn't work the first time around, disable Location Services and re-enable it, then try again.
Caveats
"Third party app stores" != "sideloading"
I've written at length about why third party app stores aren't the same as "sideloading". Check out my new project, "Does iOS have sideloading yet?", below!
https://www.doesioshavesideloadingyet.com/
The 30 day grace period
Once you take your device out of the faraday pouch and it realizes that it's no longer in the EU, a 30-day grace period begins during which you can use EU features freely. After the grace period, certain features will become restricted. You'll still be able to use any apps from alternative app stores you downloaded, but they'll no longer receive updates.
However, you can simply repeat the location spoof process again once each month, if you want to continue to access these features.
Acknowledgements
- Adam Harvey for Skylift
- Lagrange Point for their prior research
Appendix: Notes on Apple's Eligibility system
Apple's Eligibility system has been mostly reverse engineered and documented, but I wanted to add some of my notes here for future reference.
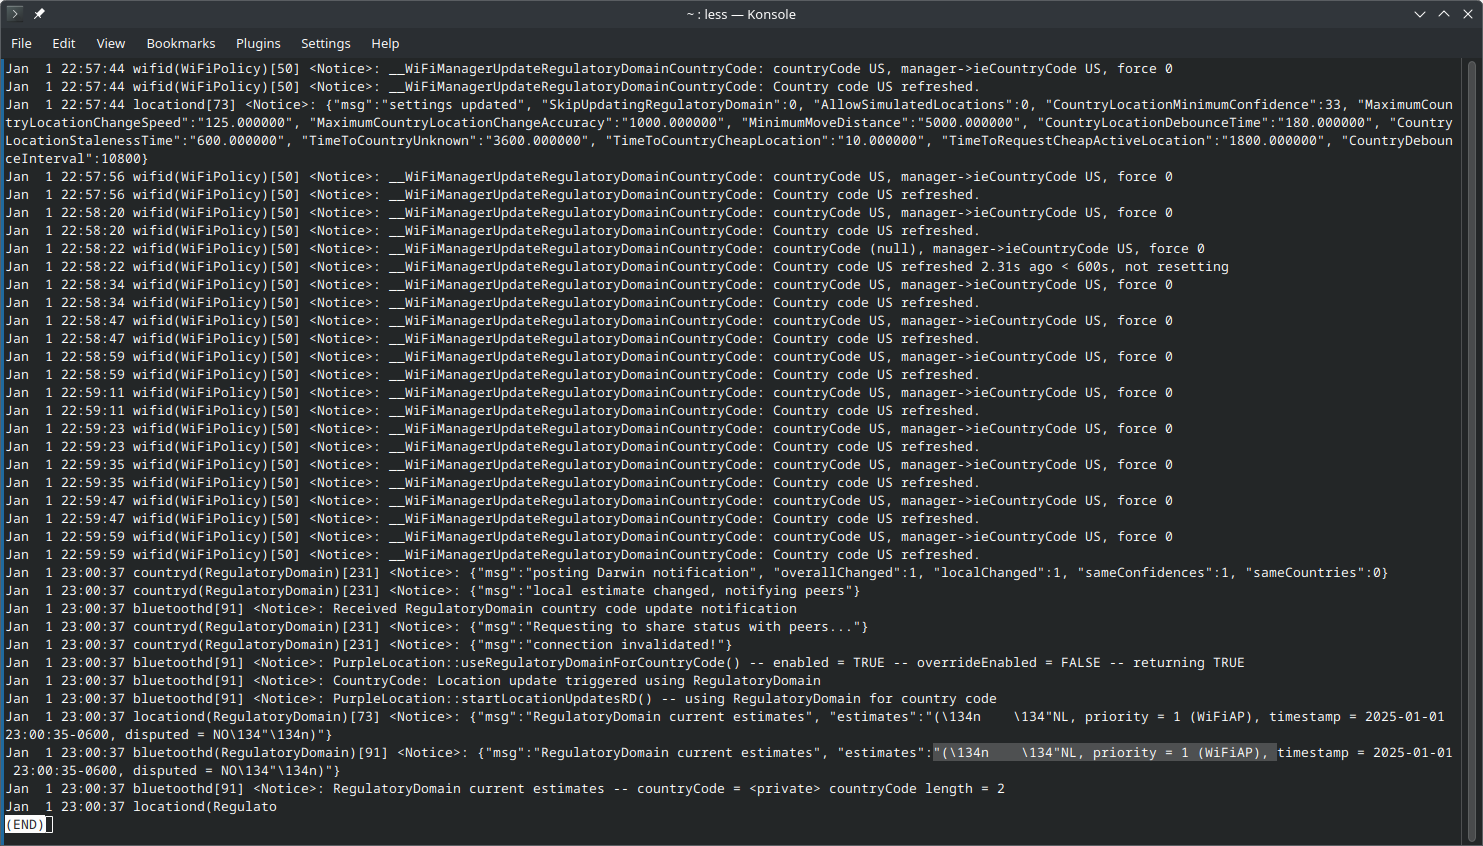
As noted in the Lagrange Point article, you can monitor the activity of the eligibility service by monitoring the device's system logs, either through Console.app on macOS, or libimobiledevice on other platforms. This command is especially helpful:
idevicesyslog | grep RegulatoryDomain
Here's a sample output:
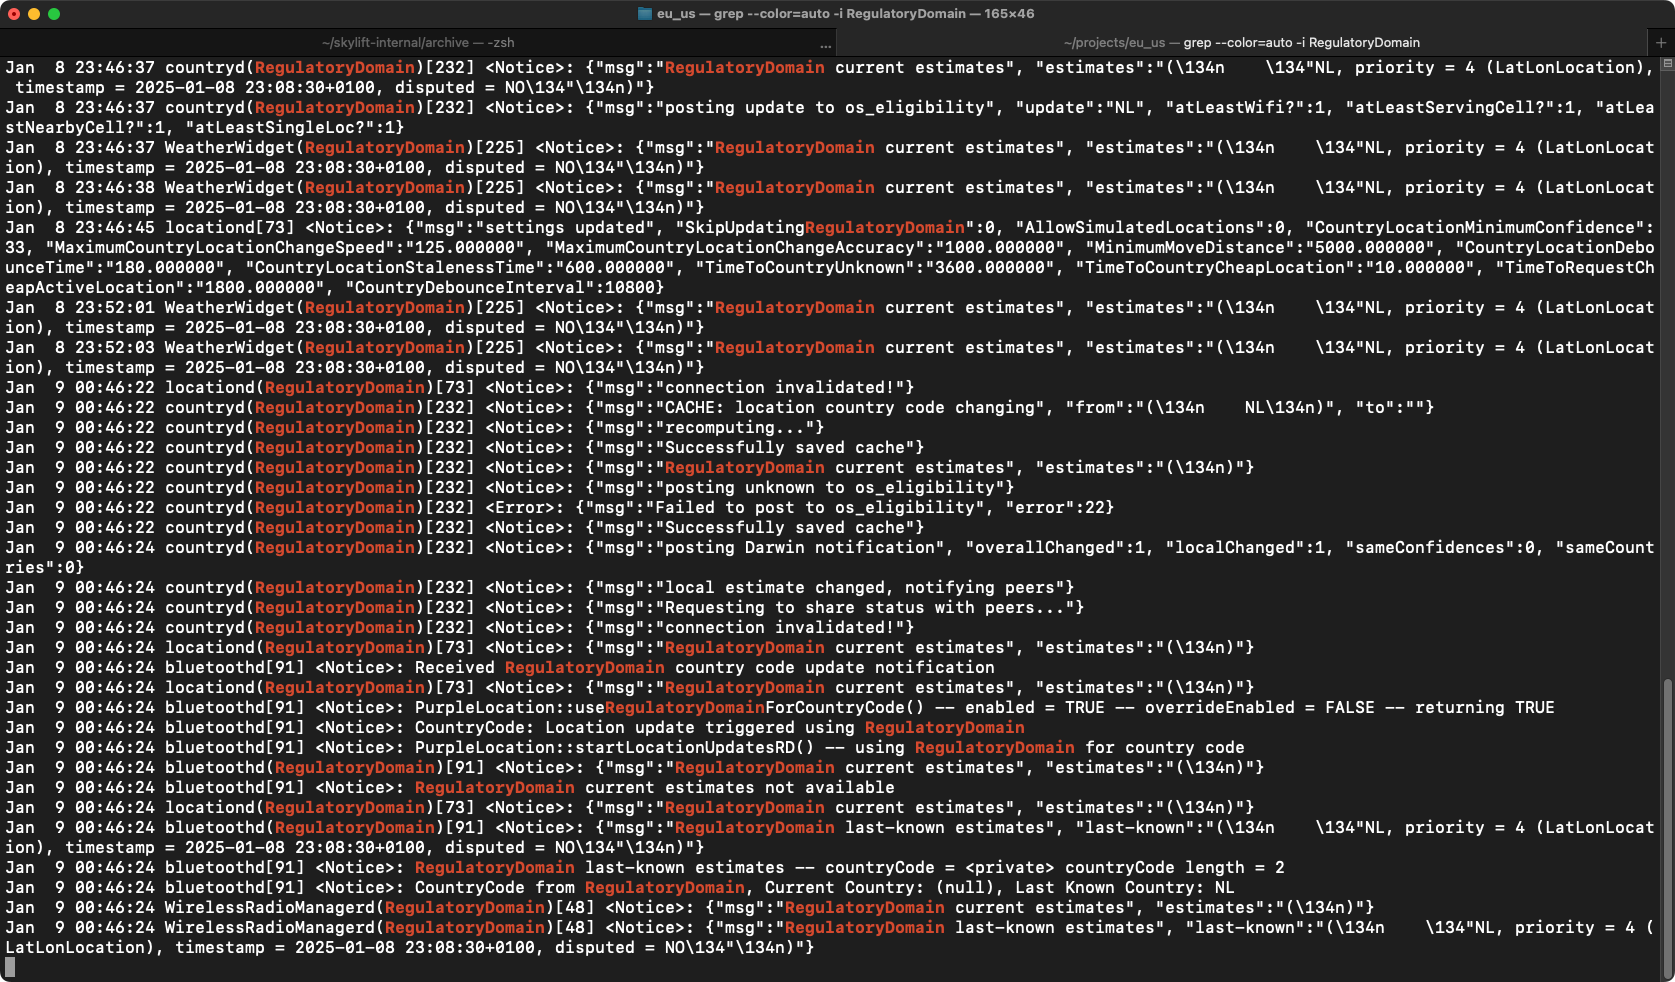
Here's the different location estimate methods, sorted by priority from lowest to highest:
-
WiFiAP(1): Uses the two-digit country codes of nearby Wi-Fi access points -
ServingCellMCC(2): Uses the MCC code of the cell tower that the device is currently connected to(?) -
NearbyCellsMCC(3): Uses the MCC codes of nearby cell towers -
LatLonLocation(4): Uses coordinates from Location Services (GPS/Wi-Fi)
According to the Apple Wiki article:
countryd uses a mix of all signals to decide which country is the most likely physical location of the device.
However, I found that, in practice, if conflicting information is available, countryd will simply use the estimate with the highest priorty.